Jan Christian


DIY SLA Battery Pack for Speedlites

49 Comments

When you don’t mind packing some extra weight and bulk, sealed lead acid (SLA) battery packs are great. They last forever and recycle the flash very quickly. Just be careful when shooting at full power that you don’t melt your flash head! I also like that SLA batteries are supposed to be charging when not in use. This means they’re always ready to shoot when you are.

Making one is pretty simple if you can drill and solder. See for yourself!

You can go with as large or small of a battery as you want. I went with a PowerSonic PSH-655-FR ($11 each). This is a “high rate discharge” battery and can handle any flash demands you throw at it. I thought this size battery would be the best compromise between size and performance, it has worked out great for me. It is rated at 6 volts, 5.5 Ah and 21 watts per cell. I also got the PowerSonic PSC-61000A-C 6 V – A-C Type charger ($40) and made a cable so that I can charge two battery packs at once. This charger is nice in that it automatically switches to a float charge.

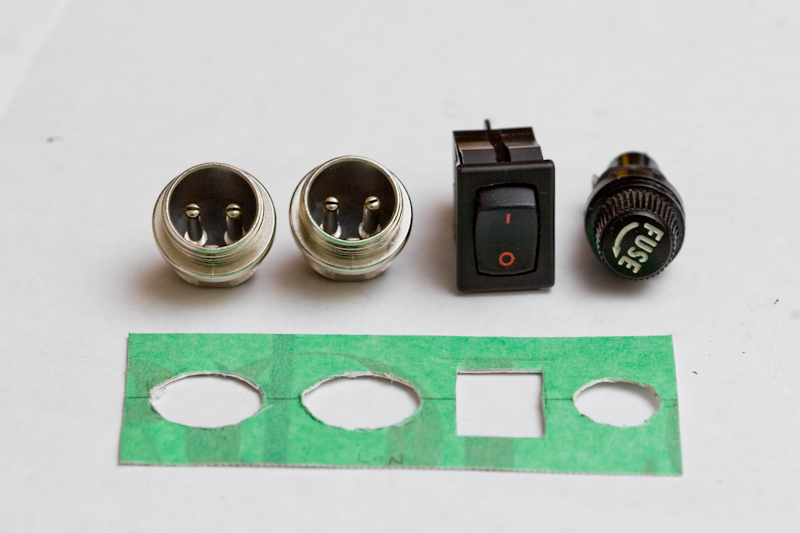
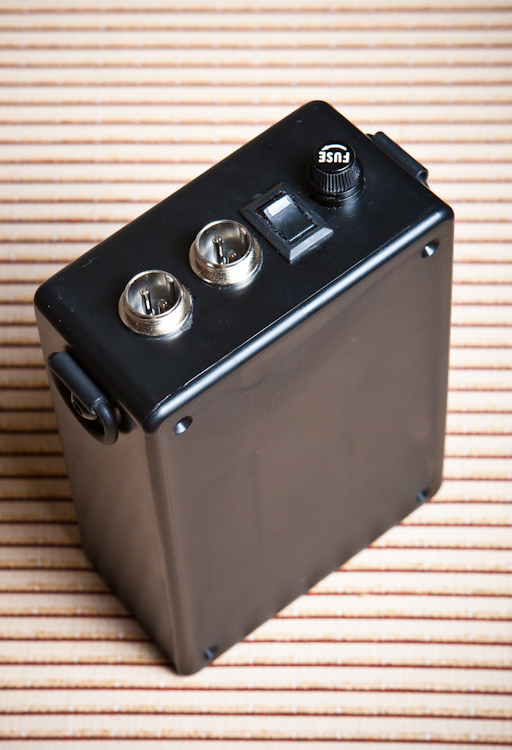
To house the battery, I got a 6″x4″x2″ Project Enclosure from Radio Shack. I wanted the option to power two flashes from one battery so I got two two-pin CB style sockets for the case. I also added a switch and a fuse (5A). Because the pins on the connector are open and exposed (I couldn’t find any caps), the switch is to prevent any accidental shorts. The fuse is an extra safety measure in case something shorts the pins while the switch is on. The green thing is just a template I made to mark the enclosures for cutting.

electrical components


edit: the previous wiring description was incorrect. Thanks, Michael Bass, for pointing that out. My battery packs were wired correctly, just the description was off. That’s what I get for rushing…

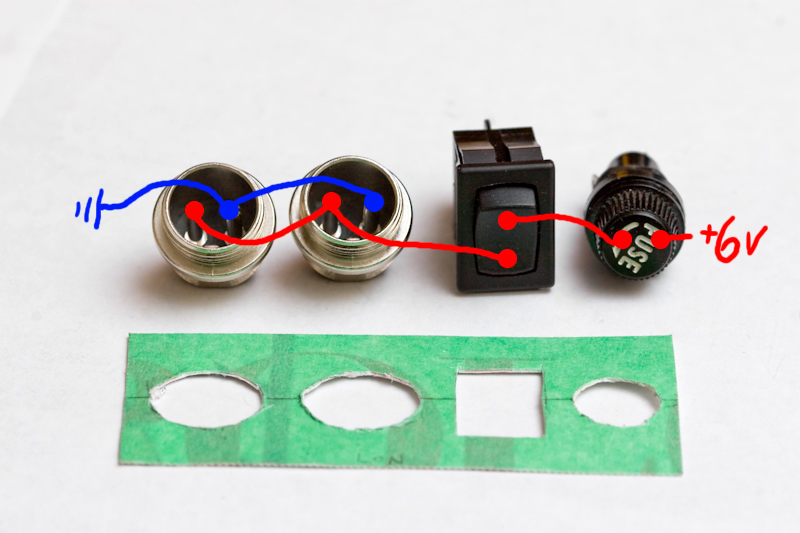
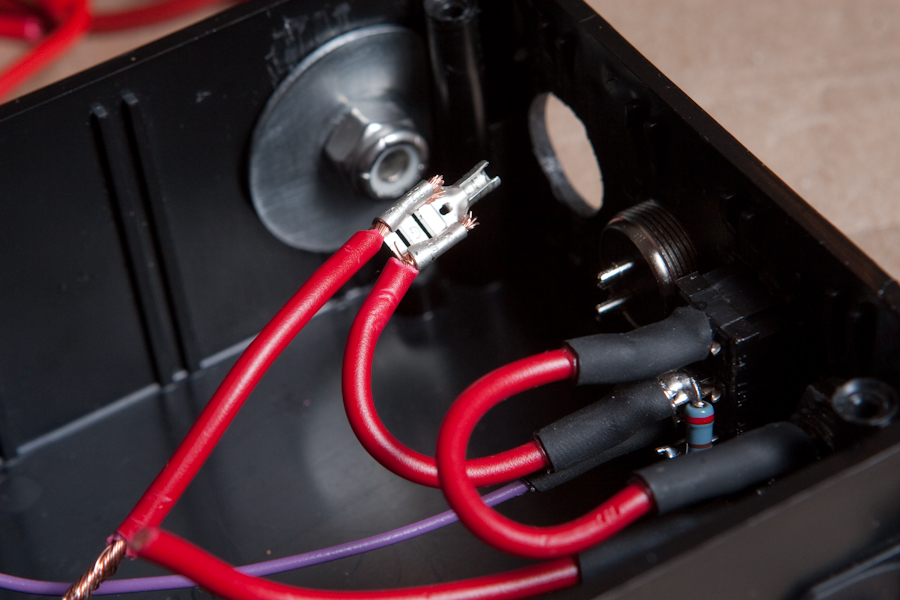
Wiring it all up is rather simple. Go from the positive battery terminal to lead 1 of the fuse, lead 2 of the fuse to lead 1 of the switch, lead 2 of the switch to pin 1 on both CB connectors. I used a lighted switch so I also had to add a resistor, which I used to pull power from lead 2 on the fuse. Then from the negative battery terminal go to pin 2 on each CB connector (then to the switch light, if you have one).


edit2: Here’s a diagram for the visual learners

schematic

switch

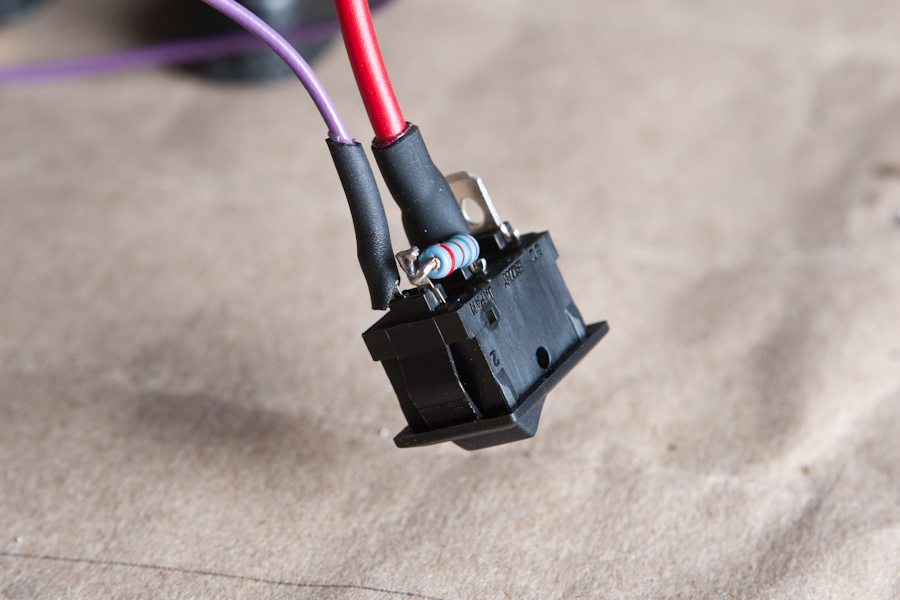
To attach two wires to one prong of the “CB socket” I used a female blade connector backwards:

female blade connector2

female blade connector

On the sides of the enclosure I attached metal D-rings with clips, which I got from Strapworks.com, my go-to place for webbing and hardware (I love how you can get the metal hardware powdercoated in a variety of colors). I also got some webbing and snaphooks and made a strap so I can either shoulder the battery pack or let it hang from a light stand.

On the inside of the enclosure I had to remove those small “rails” running down the side (they’re for holding a PCB) so that the large washer could lie flat. With these D-rings I attach a strap I made that lets the battery pack hang from the swivel bracket handle on the light stand.

inside battery pack

Finish product:
battery pack top

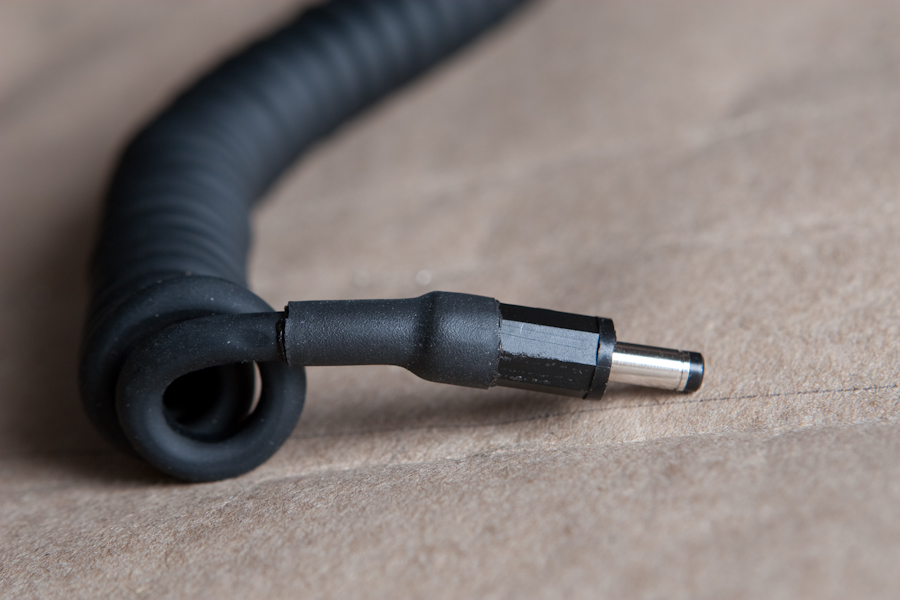
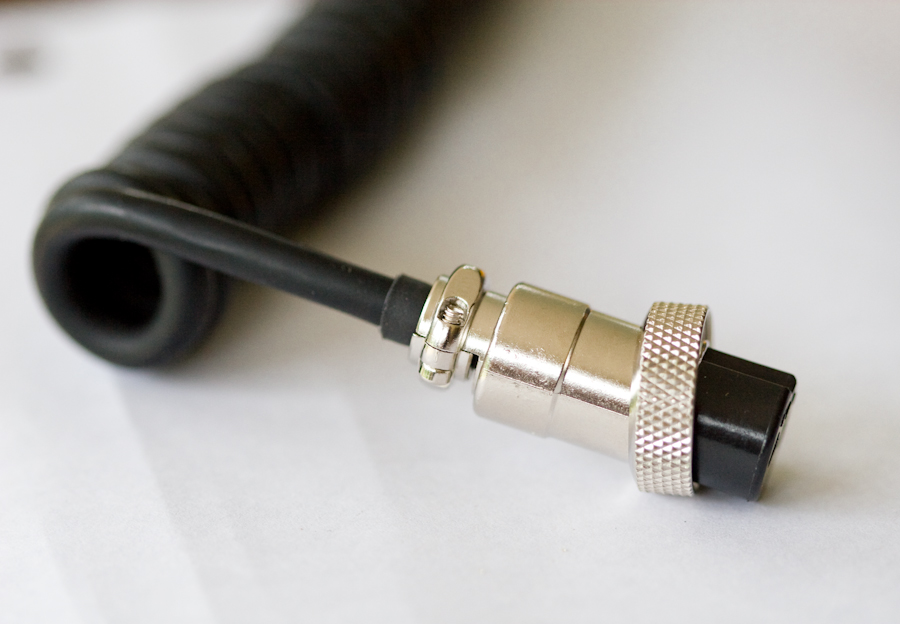
For cables, I ordered Quantum battery pack cables from ebay and cut the ends off so I could use my own. This part is pretty self explanatory. Just make sure you have the right connectors to match the jack on your flash and those on the battery pack, then keep polarity consistent.

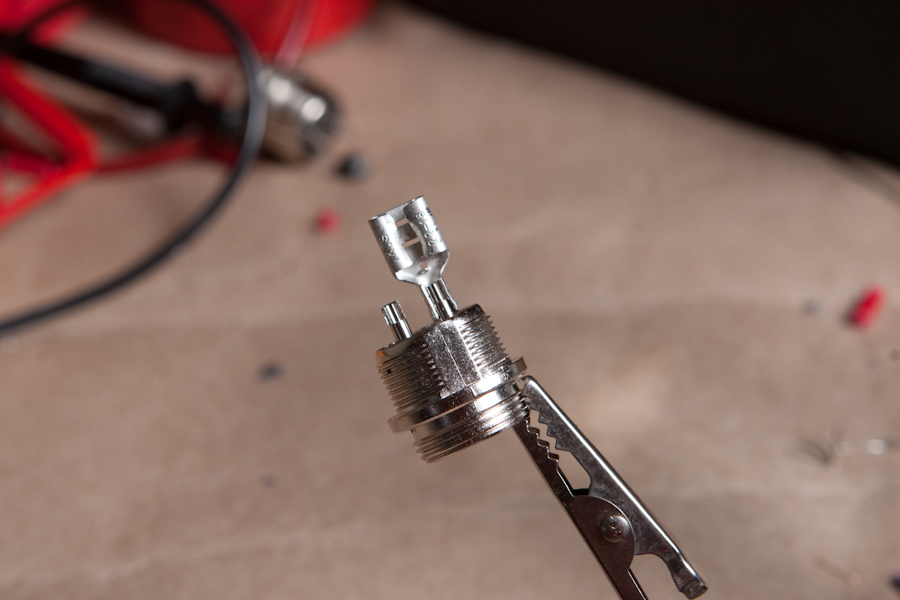
Generally, the inside part of the plug below is used for the positive wire while the barrel is the ground. That’s how I wired it.

DC plug1

DC plug2

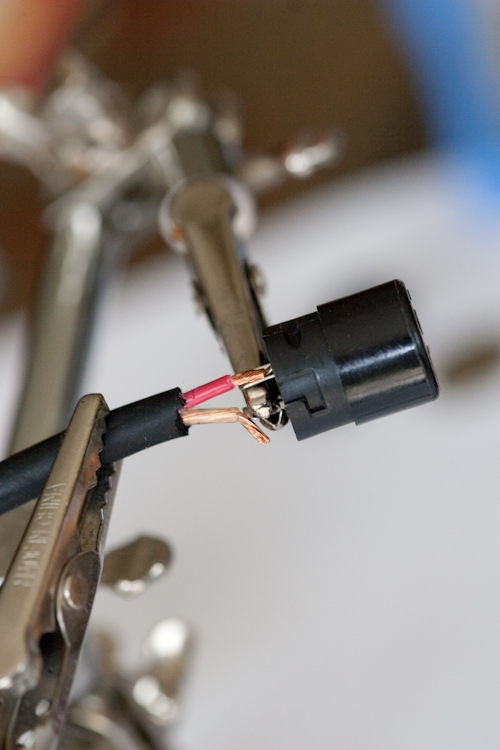
Soldering the wires to the CB style plug was a little more difficult but having a set of “helping hands” really helped…

CB plug1

CB plug2

Put the same style CB plugs on the cable for the charger. Since I made two battery packs, I split each terminal on the charger into two leads. I heat-shrinked the joint together and put the wires into expandable braided sleeving.

battery charger

batteries charging

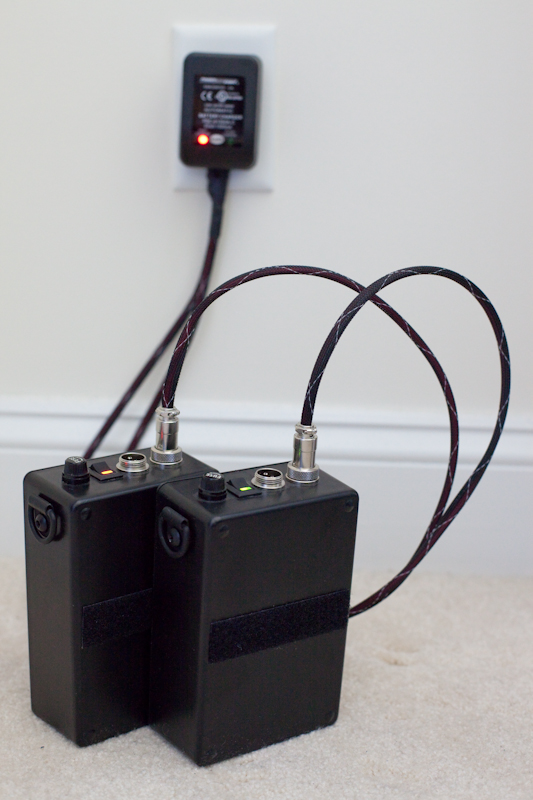
When charging, be sure to flip the switch ON. The loop velcro you see on the front is for a little strap I made that goes around the battery pack and light stand tube. It keeps the battery from swinging around when I need to move the stand.

All in all, it’s a relatively low cost project that yields great results. I’m glad I did it!

Share

49 Responses to “DIY SLA Battery Pack for Speedlites”

  1. CLilly88 Says:

    Hey this is an awesome and helpful DIY! Thanks so much.

  2. Ryan Says:

    Would it be possible to get a wiring diagram? I have no electrical knowledge and I want to make sure I am doing this correctly. Thanks

  3. frankd Says:

    Hi there,
    I was wondering if you can explain how you wired this. Did you connect one CB socket to the other making one circuit or are both CB sockets wired to the fuse independently creating two circuits. I have created this similar circuit but my fuses keep blowing.
    Thanks

  4. Jan Says:

    The CB sockets are wired in parallel, both CB sockets are connected. Reread (slowly) the paragraph on wiring and map it out if you have to. You’ll get it.

    edit: I added a wiring diagram.

  5. frankd Says:

    thanks for the tutorial, finally got it right. I’ve been looking for this info for a very long time. Thanks again.

  6. Blog.ShawnSandy.com- Just another SHAWNSANDY.COM site- Photography (OTW) 13:10 Says:

    [...] Check it out http://ambrotosphotography.com/blog/2010/05/diy-sla-battery-pack-for-speedlites [...]

  7. Georgie Says:

    so then how to you attach it the flash unit coz altho I understood and appreciated your DIY I lost you toward the end

  8. Jan Says:

    See this post: DIY DC jack in 580ex Speedlite for external battery pack

  9. Damien Sim Says:

    Was wondering what was the ohm of the capcitor that you solder onto the on’off switch. I just bought all the components today and was stump on the capacitor. (Please don’t tell me to look at the picture… partially color blind and squinting at capacitor color codes doesn’t help :D )

  10. Jan Says:

    Hey Damien, my switch required a 180Ω resistor but yours may have different specs (a different LED). If you let me know the specs of yours, I can tell you for sure.

    Sorry for the delay!

  11. Damien Sim Says:

    Jan,

    Thanks :D Just saw the answer to my post… The switch that I got is a 16A 12V switch and the battery that I got to power the whole rig is 6V 5 Ah/20 Hr SLA Battery. Would it still work with a 180 Ohm resistor?

  12. Jan Says:

    Does the box the switch came in, or the paperwork, mention the forward voltage or current of the LED/bulb?

  13. Damien Sim Says:

    hahaha :D Sorry man, I picked it out of a loose box at a local electronic store… trust me, if I could ask the sales person about the forward voltage/ current of the LED/bulb, I would… however my Thai isn’t that great and I don’t think it would be one of the normally asked questions they get (trust me, getting all the components was very, VERY frustrating to begin with :D )

  14. 6v SLA battery pack for Nikon SB-28 « Andy Vaines Says:

    [...] janchristianphoto.com/blog/2010/05/diy-sla-battery-pack-f… [...]

  15. ACL Says:

    Jan: Great tutorial. What gauge wire did you use from battery to fuse/rocker, and in btw CB female ports? I can’t clearly tell in the picture, but 16 AWG is plenty on a 6A battery? Secondly, where did you purchase the mini rocker switches? I see self lit switches everywhere, but they’re usually 120V which doesn’t apply with SLA batteries. Great work!

  16. Jan Says:

    Thanks! I used 14 AWG for all of the battery connections. 16 would probably be fine but I like to overbuild. I got the switches from Baynesville Electronics (http://www.baynesvilleelectronics.com/index2.ivnu) in Maryland (awesome store!). Some illuminated switches have the LED independent of the main input, which means you can use the switch at any voltage you just need to control how much goes into the LED. The switch I used had four terminals: switch-in, switch-out, LED-positive, and LED-ground. I used a 180Ω resistor to bridge from switch-out to LED-positive.

    I’m thinking about selling these battery packs so if anyone’s interested in them, let me know! With Elinchrom Quadras, I just don’t use my Speedlites as much as I used to.

    Damien, did you get it figured out? I thought I replied to your post already but apparently not, sorry! How many terminals does your switch have? If it has three then that LED is probably wired to run off of 12 V. If there are four terminals then the LED is independent of the switch input and requires a resistor. Try a 180Ω.

  17. ACL Says:

    Jan: Thanks. I found some on ebay & partsexpress.com, and will try them out. One more question on your quantum cables. Did you purchase the ones for the turbo express battery packs (ie with the 5 prong male connector), or something more generic? I have a Nikon SB-28 and was looking at the Quantum CK cable in order to plug straight into the built-in power port. I see two main wires when you stripped it, so wasn’t sure what your original plugs looked like.

  18. Jan Says:

    I wanted the cable with the largest gauge wiring and I only needed two wires in the cable so I got the kind with dummy batteries on one end and an RCA connector on the other: http://img.photobucket.com/albums/v69/SpeakerPhreaker/DummyBattery.jpg

  19. Damien Says:

    Jan,

    The switch is three prong… the battery pack project has been put on hold for awhile. Will be looking over on the plans soon. Thanks fror the input :D

  20. Janne Says:

    Hey,

    The end result looks great and I think this kind of build will work really well.

    The only thing I see wrong here is that you shouldn’t charge SLA batteries in a closed container.

    Don’t know how bad it could get in your design, because the enclosure isn’t exactly airtight, but I’ve dealt with DIY scuba lights which are tightly closed usually with an o-ring and they are always charged with the lid open.

    If I remember correctly, SLAs can make a hydrogen buildup in the container due to the charging and when that goes, it goes with a bang.

    For that reason (and weight & size reasons) I decided to try 9000mAh NiMh D-batteries (10 of them) in a scuba light, but that got buried since the batteries would only work a couple of minutes with a 50w halogen.

    So I have them lying around and I think I’ll try to make them in a battery pack for my SB-28:s next week.

    Thanks for the inspiration and greetings from Finland.

    Janne

    P.S. Look into the SLA charging issue and at least don’t leave them unattended while charging…

  21. Darin Says:

    I have a 12v battery, is that going to blow my units up?

  22. Jan Says:

    Janne,
    That is definitely something to consider. However, like you said, these enclosures definitely aren’t airtight so they should be fine. I contact Power-Sonic about this issue and this is what they had to say:

    “Caution: Never charge or discharge a battery in an airtight enclosure. Batteries generate a mixture of gases internally. Given the right set of circumstances, such as extreme overcharging or shorting of the battery, these gases might vent into the enclosure and create the potential for an explosion when ignited by a spark. Generally, ventilation inherent in most enclosures is sufficient to avoid problems.”

    After reading that, I feel pretty confident that this design is safe, especially since I’m using a good charger that wont overcharge them. Also, Al Jacob’s Black Box battery packs (where I got the idea for these) uses this same design and I haven’t seen any mention of having to open the box before charging them. But, as always, use at your own risk!

  23. Jan Says:

    Darin,
    Yes, probably. Speedlites are meant to run off of 6 volts, doubling that could surely do some damage.

  24. Sean Says:

    Jan,

    Thank you so much for your tutorial. I’m thinking of using 2.5 x 5.5 panel mount and long coaxial plugs for the power. It’s located here http://www.philmore-datak.com/mc/Page%2063.pdf. Part number 325 and mating plug 250. What’s the reason for using the CB connector?

  25. Jan Says:

    You’re welcome! I chose CB connectors so they’d be more secure. I didn’t want the coiled cable to pull the plug out if there’s any tension on it. Since the CB connector locks on tight, all I do is add a strain relief below the connection at the flash and both are secure.

  26. Sean Says:

    Keeping the plug secure is great idea. I’ll have to hunt for the 2-pin CB connector. I couldn’t find any as they were either 3 or 4-pin, and I don’t know how to wire them. So I opted for the DC jack/plug but had reservation. I’ll be visiting another electronics store in a couple of hours to see if I can make that purchase.

    Again, I love your quality work.

  27. Sean Says:

    Jan – can you please elaborate on “Since I made two battery packs, I split each terminal on the charger into two leads. I heat-shrinked the joint together and put the wires into expandable braided sleeving.”

    I see that you’re daisy-chaining the batteries when charging them both at the same time. Do you have pictures of the underlining wiring of the charger for the visual learner, like me? I’m not sure the wires are run from the DB plug to the terminals on the charger. Thanks.

  28. Jan Says:

    Thanks!

    Don’t bother searching for a 2-pin connector, the 3 or 4 will work just as well. Just ignore all of the pins but two–don’t connect them to anything.

    Re the charger: look at the second to last photo. See how there’s a (+) and (-) terminal? Normally one lead would go from (+) on the charger to the (+) of the CB connector and the same with the (-). All I did was attach two wires to each terminal. That way each terminal on the charger splits off into two so I can charge two battery packs at once (they’re wired in parallel). Here’s an image I found online that shows the same thing: http://www.caraudiohelp.com/images/parallel_wiring.gif

    I heat shrink all connections and the braided sleeving is mainly for looks. I hope that helps.

  29. Sean Says:

    Beautiful! Very clear Jan. Thanks!

  30. Barry Says:

    Jan,
    I have built a power supply based on your design using a Yuasa 6volt , 4amp SLA. I don’t have any shorts but while charging I seem to have blown the fuse. It could be because of a spike that happened when I turned the switch off and back on with the charger connected. I can’t see the rating on the one that was in the fuse-holder, but I will need another. What rating fuse would work without blowing all the time but
    still protecting from extreme over-voltage or current?

  31. Jan Says:

    I haven’t had any problems with the fuse blowing while charging but sometimes while shooting, the fuse blows when the flash fires. I’ve tried a few, up to about 5.5 amps, but got tired of buying new fuses so I bypassed the fuse. It isn’t really necessary as long as you don’t intentionally short out the prongs on the CB jack, just make sure you turn the pack off when you aren’t using it. I’m just used to adding fuses to my other electrical projects so I threw one on this battery pack.

  32. Sean Says:

    I, too, have gone through lots of fuses. I’m ok at 1/64, 1/32 but at full power, they blow. Any reason I shouldn’t try 10A fuses?

  33. Jan Says:

    Nope, let me know how it works out.

  34. Sean Says:

    Using 6.5A fuse and so far I have not had one blown yet.

  35. Louis Says:

    Hi, is it possible to please send me the wiring diagram of the connector for the Canon 580EX ii. I would hate to blow my flash… Thanks so much

  36. Jan Says:

    Are you talking about the high voltage port? If so, I don’t have the pinout for that, sorry.

  37. Dave Says:

    I’ve read some of the comment posts here, particularly about the fuses blowing. The comments about bypassing the fuse, I don’t think that’s a good idea. It’s only 6 volts, 5.5 Ah – not a huge source but if it were to direct short across the terminals it could still heat up and melt the wires. Granted, if care is used with the battery pack that’s not likely but if the strobe overheats and creates a heavy short internally, it could easily overload the wires between battery and strobe creating a dangerously hot piece of exposed wire. The complicated solution would be some sort of current limiting circuit (I wish I was smart enough to design one), a simpler solution may be to use either a slow blow style of fuse, or a fusable link that’s temp sensitive. The slow blow fuse will withstand an overload for a very short period, the fusable link could handle it for a longer period.

    Either way this is an awsome project and I do intend to copy your design. I have several of the early design 283 strobes. I will make at least a couple of these. This is a very portable power source, any strobe that uses a 6V battery source can use these. Create it bit heavier duty and add a DC to AC converter and you can power monolights on location too. Great idea!!

  38. Daniel Sullivan Says:

    I see that this is an older post, but you’re still answering questions in the comments (thank you for that!). I have two (or 100) for you.

    You state that this recycles the flash very quickly (and even warn about overheating), however, everything I’ve read about SLA batteries states the contrary. My questions are:

    Have you done any comparisons or other tests to determine recycle speed?

    Is recycle speed related to your dc jack mod (as opposed to using this with a dummy battery set)?

    (okay, three questions) Have you looked into using a 12V battery and the guts from a CP-E4 (or equivalent) and running right into the High Voltage Port?

    Thank you again!

  39. Jan Says:

    DAVE: I would’ve purchased a slow-blow fuse but couldn’t find any locally at the time. I’m just careful with what is around the terminals when the unit is turned on. You can even buy caps for the terminals but I haven’t since I don’t really use these battery packs anymore. If you want to power strobes , a common and good inverter is a Samlex pure sine wave. For reference, the Vagabond I uses a 150 watt inverter and the Vagabond II uses a 400 watt inverter.

    DANIEL: I should’ve elaborated on the “very quickly” comment. This battery pack doesn’t recycle the flash any quickER than standard AA batteries, it just recycles at “fresh AA” quickness for much longer. The recycle rate using AAs declines at a steady rate whereas the SLA battery keeps it high and level. The DC jack is no different (performance-wise) than dummy batteries, I just wanted an OEM-looking solution. I haven’t looked into a DIY CP-E4. FlashZebra offers a nice alternative for a great price so I’d just use one of those: http://flashzebra.com/products/0155/index.shtml I hope that helps!

  40. Mi batería DIY | Off camera flash Says:

    [...] Batería 07 [...]

  41. My DIY battery | Off camera flash Says:

    [...] Battery 07 [...]

  42. Rob Retting Says:

    Do the 4 AAs inside the flash need to be at a full charge for the external pack to properly run? What if the AAs are at a low level?

  43. Jan Says:

    The external battery pack is used instead of the 4 AAs, so you should remove them.

  44. Rob Retting Says:

    Hi Jan, I’m using Canon 580EX series. I think the cord plugs into the lower side of the unit, which serves as both high voltage external power and low voltage. For low voltage, I believe the external 6v pack just ads to the total amp hr output, thereby extending the cycles. I’m told you need to keep the 4 AAs inside to maintain basic flash unit functions. Are you saying that by using a dummy battery pack inside the unit connected to the external 6v power would be the better way to go? Thanks.

  45. Rob Retting Says:

    Sorry for the confusion…I had not read your previous article on making an external jack for 580EX. Now it makes more sense. I’m still not quite sure as to why you went through the effort of making a separate jack, when one can use the existing HV port to run low voltage as well? Please correct me if I’m wrong. I’m assuming that… because of the various low voltage packs on the market (ie: CP-E4) and how they make use of the existing HV Port.

  46. Alexandre Says:

    Hi there,

    I’m trying to set up a battery pack like this but i have a little problem.
    The wire that i’ve bought, a Quantum battery pack cables for a Nikon SB-28, has 3 inner wires (1 black (- i think), 1 red (+ i think) and a white one that i don’t know what it does. I have a 3pin CB connector too and i don’t know how should i mount it. Can you help me please?

    Regards,
    Paulo Costa

  47. Jan Says:

    Hi Paulo,
    For the CB connector, just ignore one of the pins since you only need two, and make note of the polarity of the two pins you are using. What are you using on the other end of the cable? Are you cutting the connector off and adding your own, as I did? If so, just ignore one of the wires. I hope this helps!

  48. David Says:

    Hello!
    first of all, thank you very much for sharing.. you did an amazing job.

    I carefully followed your instructions and did the same design; the only difference with yours, is that I used a 7.2Amp SLA battery.
    When I fired my yongnuo 560 on full power, it takes about 10 seconds to recycle; do you think that it is normal? who long does it takes with yours?

    using AA batteries fully charged, it takes no more than 3 or 4 seconds :-S

    thank you very much

  49. Tasos Says:

    David,

    It has to do with battery’s Internal Resistance. Check your battery specs for that kind of number

Leave a Reply